 Et voici le dernier post de cette série consacrée aux tabliers croisés dans le dos faits la semaine dernière et à leurs accessoires. Je changerai de tissus à l'issue de ce tuto, promis... mais ils pourraient réapparaître dans quelques temps, sous d'autres formes ;-)
Ces petites barrettes demandent peu d'effort et ne nécessitent pas de machine à coudre !
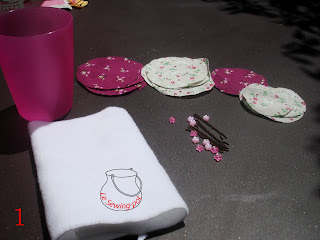
 Etape 1 : Rassembler le matériel : des cercles de tissus de diamètre différent, ici faits à l'aide du gobelet présenté, des perles ou des boutons, du fil et une aiguille, du molleton ou du polaire pour le dessous de la barrette ou encore du jersey (le tout est que le tissu choisi ne s'effiloche pas), et bien sûr des barrettes. Vous pouvez choisir des pinces, mais aussi des pinces clic-clac ou des pinces crocodile.
Etape 2 : Faire un yoyo avec un grand cercle. Je n'ai rien inventé, on trouve facilement des tutos pour faire des yo-yo !
Il s'agit dans un premier temps de prendre une grande aiguillée de fil, qui servira pour toute la barrette et de faire des points au bord du tissu.
Etape 3 : Tirer sur le fil pour obtenir un yo-yo. Pour ces barrettes, j'ai utilisé le côté plat des yo-yos, c'est à dire celui que vous ne voyez pas actuellement.
Etape 4 : Faire passer le fil sur le dessus du yo-yo, et faire un deuxième yo-yo, avec un petit cercle.
Etape 5 : Mettre les yo-yos côté plat au-dessus et coudre la perle ou le bouton au centre. J'aime bien utiliser des perles : ça me permet de diminuer un peu le stock de mes filles.
Etape 6 : Pour cacher le dessous du yo-yo, couper un cercle du tissu choisi, ici de la polaire blanche.
Etape 7 : faire glisser la barrette sous la polaire et coudre tout autour.
Retourner et admirer votre travail !
Here is the last post of this cycle dedicated to the tops I made for the girls last week and the coordinated hair accessories. I promise I'm gonna use other fabric next week. But these STOF fabrics may come back one way or another some day...
These hairpins don't need much effort and for once, you don't need to own a sewing machine !
Step #1 : Gather all your supplies : two sizes of circles, I used the glass shown as a pattern, pearls or buttons, needle and matching thread, fleece or jersey fabric for the downside, no matter as soon as your fabric won't fray, and bobby pins. You can also use other kind of pins, such as hair snap clips or alligator pins.
Step #2 : Sew a yo-yo with a large circle. I did not create anything, you can find tutorial sfor these yo-yos all web around. You'll have to cut out a long length of thread, that will be used for the whole hair pin, and handsew all round the circle.
Step #3 : Pull softly the thread, until you got a yo-yo. For these hairpins, I used the flat part of the yo-yo, the one you can't see on picture 3.
Step #4 : Pull you thread through the yo-yo and make a second one, using a smaller circle.
Step #5 : Put the yo-yos flat side up and sew the pearl or the button on the center. I like to use my daugthers' pearls, because it helps decreasing their stock.
Step #6 : In order to hide the wrong side of the hair pin, cut a little circle out of the chosen fabric (here white fleece).
Step #7 : Slip the pin through this litte circle, and sew all around.
Turn out your work again, and be proud of your work !


Aucun commentaire:
Enregistrer un commentaire